Here’s a question: what image would you choose to represent ‘science’? If you search ‘science’ in Google Images, you’ll see a fair few images of microscopes. The microscope is a tool that people widely associate with science and research. But how did this happen? Why did the microscope become so popular?
Well, it became popular thanks to Robert Hooke’s book Micrographia (1665). This book marked a milestone in scientific history. It showed the science community how to use microscopes to analyze and study the micro world, with hand made drawings of cells, fleas and insects.
Now, 351 years later, we might be experiencing another profound turning point in science. And I’ve though of a title for the associated book: Nanographia! The popularization of low cost, do-it-yourself atomic force microscopes will allow us to explore the nano world. But, how did we get here? How old is the microscope? Let’s start… from the beginning.
Indeed! It’s a long story, but worth it. Bear with me.
The early years of the microscope
Evidence suggests that the first compound microscope was built in the Netherlands in 1620. Almost 400 years ago!
But at this point, the microscope didn’t have a name. Huh! We had to wait another 5 years before it was named. In 1625 Giovanni Faber – a fellow of the Lincean Academy - coined the name microscope, after Galileo Galilei presented it one year before. The name comes from the Greek words μικρόν (micron) meaning “small”, and σκοπεῖν (skopein) meaning “to look at”.
So we know when it was named, but when did it become a popular instrument? Well, guess what, another 40 years elapsed before the microscope becomes a popular tool used in science.
As noted, in 1665 Robert Hooke published Micrographia (PDF) – a book that inspired the use of microscopes for scientific exploration. The details and quality of his hand made drawings of insects and plant cells (engraved in copper plates) popularized his work. Check out the following images!

Hooke's microscope, from an engraving in Micrographia. Photo by Wikipedia.
The engravings were very detailed, but the most awesome feature was that you could unfold them, making them larger than the book itself, reinforcing the tremendous power of the microscope. For example, see this flea:
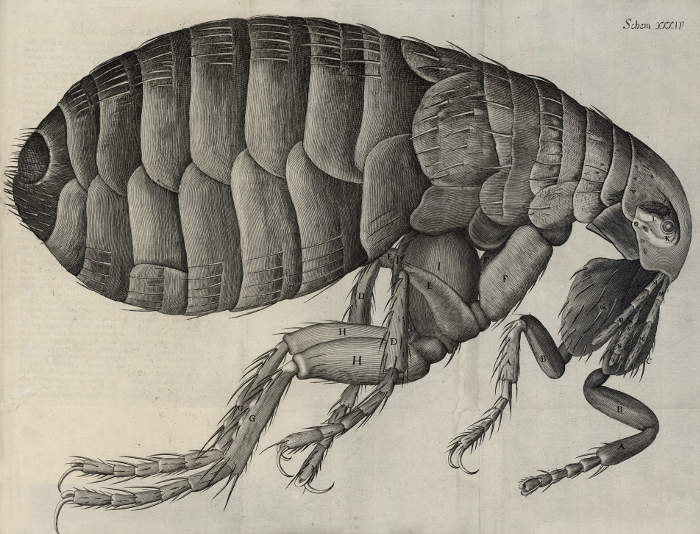
Hooke's drawing of a flea. Photo by Wikipedia.
While these achievements are amazing, you might better know Hooke as the person who coined the term cell, as the small structures he observed in a cork sample reminded him of honeycomb cells.
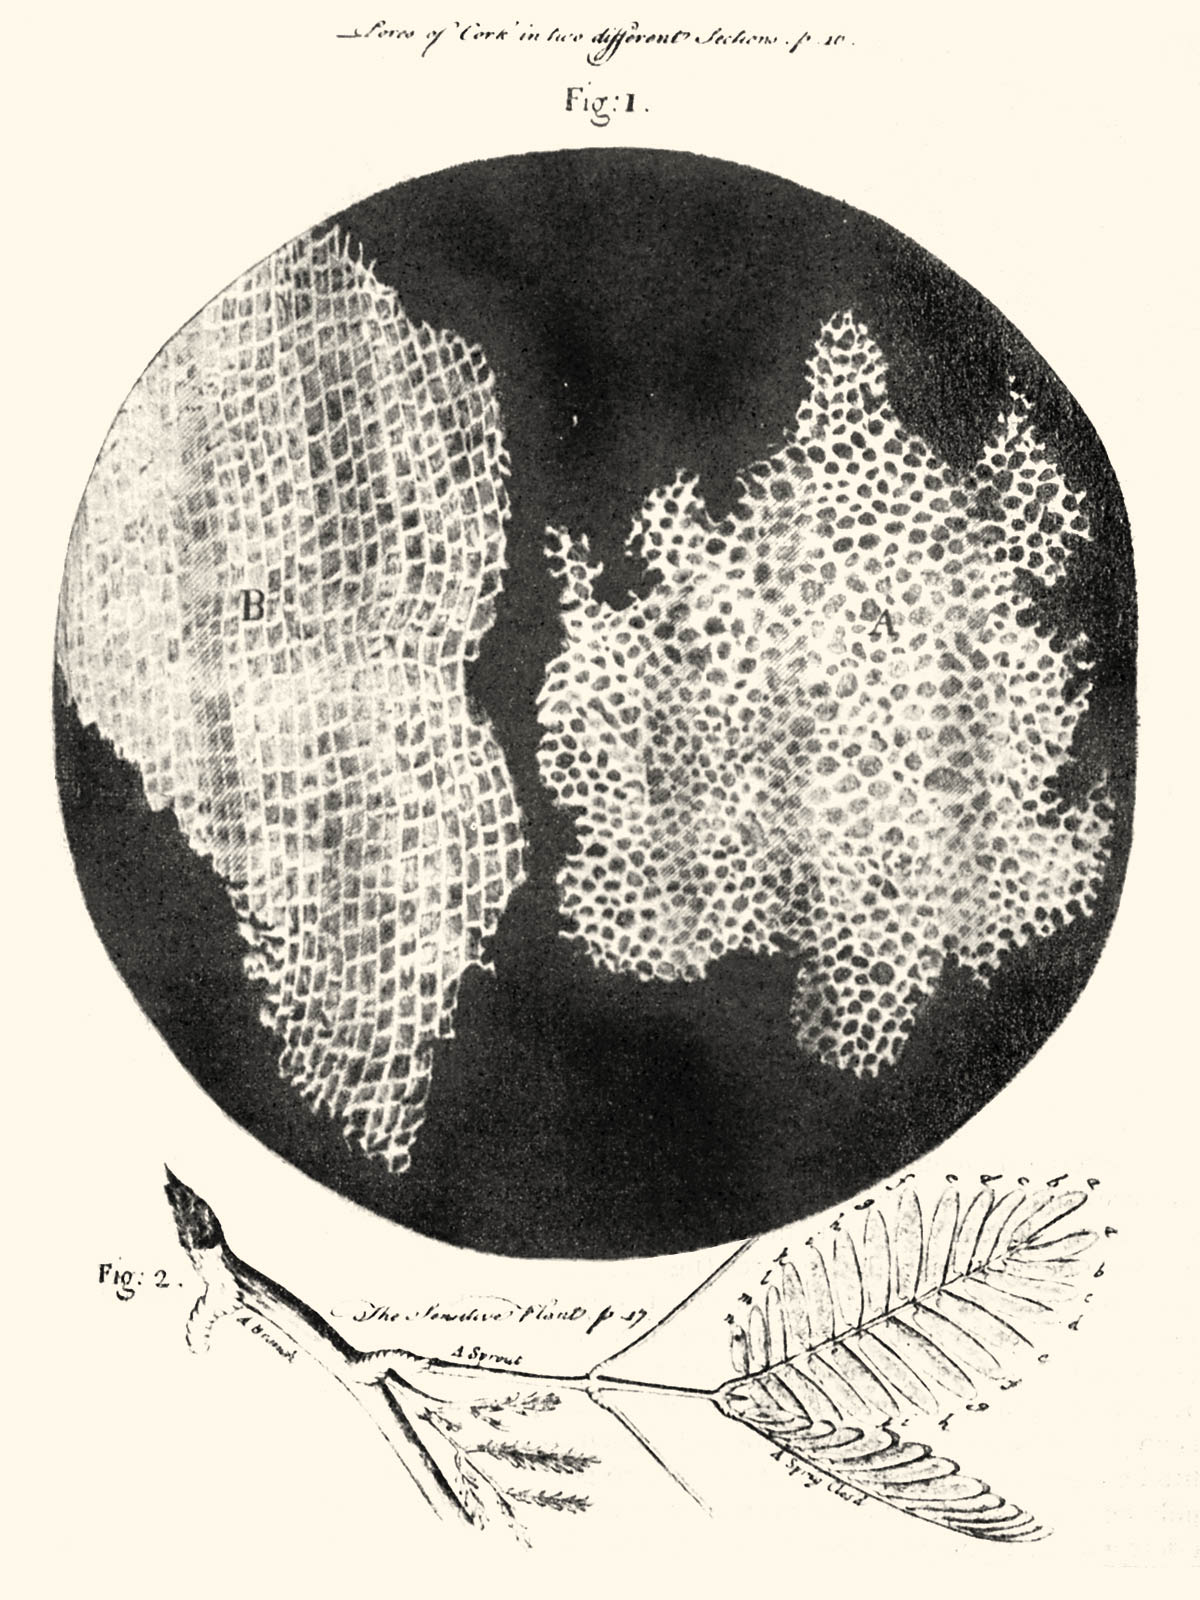
Cell structure of Cork by Hooke. Photo by Wikipedia.
The microscope becomes a scientific tool
We know when the microscope was invented, when it was named and when it became popular. Now, it’s time to learn about its impact in the scientific world (and TV shows!).
In the years after Hooke’s publication, the microscope was widely used in Italy, the Netherlands and England. The greatest contribution in this period came from Antonie van Leeuwenhoek who has been credited with the discoverery of red blood cells and, consequently, helping to popularize microscopy as a technique. On 1676, Van Leeuwenhoek reported the discovery of micro-organisms.
Side note: In truth, Van Leeuwenhoek was not the first person to describe “red particles” in blood. However, his observations were more detailed and numerous than his predecessors (Malpighi and Swammerdam).
While microscopes became widely used, they faced a problem: how to light the samples.
Lighting is key in microscopy in order to see the sample properly, so it was not until electric lamps were available as light sources that new advances and discoveries were made.
After improving the lighting, scientists started to question the limits of this technology. What’s the smallest thing that you can see with it? To answer this question August Köhler developed the Köhler illumination principle, which is central to achieving the theoretical limits of light microscopy. This was 1893.
Knowing microscopy’s limits, the pursuit of further knowledge pushed scientists to use electrons instead of light, and electromagnets in the place of glass lenses, creating the first electron microscope: the transmission electron microscope. This was 1931.

A TEM image of the polio virus. The polio virus is 30 nm in size. Photo by Wikipedia.
Other researchers tried different techniques. For example, in the 1980s some scientists started the development of the first scanning probe microscopes.
The first one was the scanning tunneling microscope developed by Gerd Binning and Heinrich Rohrer (1981). Five years later Gerd Binning, Quate and Gerber invented the atomic force microscope (AFM).
Atomic Force Microscope (AFM)
The AFM is a big step forward because it improves the quality of the images and gives us access to the nano world. An optical microscope is limited by the wavelength of light it can detect. This is called theAbbe limit, which is around 250 nm (0.25 μm).
While this resolution allows us to see most biological cells (1 μm to 100 μm), it fails if you try to study viruses (100 nm), proteins (10 nm) or less complex molecules (1 nm). On the other hand, the AFM has a demonstrated resolution in the order of fractions of a nanometer, more than 1000 times better than the optical diffraction (Abbe) limit.
While these microscopes are amazing, they’re really expensive too. One will set you back around 300,000 USD. This basically becomes a huge problem to educators, well, to anyone, as not many Institutions often do not have the cash to buy this research tool.
With this problem in mind, in 2015 the LEGO Foundation sponsored a summer school program to develop an affordable do-it-yourself (DIY) atomic force microscope suitable for use in schools by children. The result has been an open source AFM that children can build using LEGO pieces, Arduino, 3D printable parts and local components.
At the same time, Edwin Hwu and his team (who are also developing an open AFM) licensed a low cost closed-source version, the Strømlingo DIY AFM, which costs 98% less than the ones available on the market.
These big savings make AFM affordable, enabling institutions to buy cheap AFM microscopes that their students can build themselves. Moreover, this building process only takes a few hours and the kids can start operating it in a matter of minutes.
Due to this success, students will be able to see nano structures that would otherwise be impossible to view with a regular microscope, such as particles with an aerodynamic diameter of 2.5 micrometers or less (known as PM 2.5). Why are these particles particularly important? Well, because they’re among the most harmful for human health as they are small enough to penetrate deeply in the lungs and may even cross into the blood. Scary, right?
Edwin and his students have shown how affordable nanoscopes can be used to analyze and take samples of these particles and, indeed, schools all over the world have participated in his projects.
Nanographia, the drawings of PM 2.5
As Robert Hooke’s book Micrographia popularized microscopes, the low cost DIY nanoscope will enable kids and anyone with interest in this field to write the next book that will popularize this new type of microscope. If Micrographia was a milestone due to new discoveries in the micro world, affordable do-it-yourself nanoscopes will help to write the book that will make history again: Nanographia.
The book will describe how you can build the nanoscope and how you can use it for studying PM 2.5 particles. Instead of drawings, the book will feature photos showing the discoveries. As you can see, Nanographia will help to spread the word about this technology, as Hooke did almost 400 years ago.
As with any other scientific publication, there will be a subject to be studied: the PM2.5 particles. A chapter might explain what PM2.5 particles are, as well as how you can make microscope sample slides by cutting up DVD ROMs and placing them outside for at least 10 minutes.
Why are we going to use DVDs? Because the distance between the tracks in a DVD are known (740 nanometers) and we can see them with the AFM.
The next chapter will be about the analysis. Once you have the samples, it will describe how you can analyze them by hand: calibrating the samples and measuring the area covered by the candidate PM2.5 particles.
Incredible right? As we discovered this story, we wanted to contribute a few chapters for the book. One about crowdsourcing as we think it would be amazing for the crowd to analyze samples (following the citizen science approach of this project), and a second one running workshops about the project where you can learn, build the nanoscope, and analyze the samples with the crowd.
SciFabric’s chapters for Nanographia
Our desire to contribute to this book became a reality when Edwin and his team contacted us to use our citizen science Crowdcrafting platform for analyzing the samples with the crowd.
This first chapter will be about citizen science, and it will describe what is crowdsourcing and citizen science. It will explain the project where anyone can analyze samples, including links to the prototype.
Also, there will be a sub-section where we will describe the tools that we use for building the prototype, so others can replicate it (like science does!).
The next chapter will be about citizen science workshops, as we offer them to students and teachers as a new way to discover science and learn by doing. The chapter will include a new course on how you can build the nanoscope, use its technology and learn the citizen science approach.
In November 2015 we wrote the first draft. We proposed that Medialab-Prado (Madrid, Spain) organize an event like this, and they accepted.
The workshop became popular and Spanish national TV show La aventura del saber (the adventure of knowing) interviewed us, showing how we built the microscope and analyzed some of the samples (it starts at minute 14:00, only in Spanish):

Due to the success of the workshop, we were invited by Medialab-Prado to share what we built at their open day event. In the following video you can see me talking about the project (in Spanish):
The final chapter
We’ve seen the evolution of microscopes and how human pursuit of knowledge has got us here today. Nowadays we can build nanoscopes at home and explore the nano world in a few hours. The possibilities are endless, but are nanoscopes the new edition of Micrographia? Are nanoscopes making history?
Well, I would say it’s early to know, but the truth is that it has lots of potential.
I can barely imagine how kids will be building and using this tool trying to understand what lies in the nano world, and the best part is that we’re exploring it together!
By the way: High Five! You are awesome! You just read until here, so cool!
Now, get away from your laptop, tablet or phone and enjoy a beer, coffee, whatever you like. It’s been a long read and you deserve it!